
Micro Frontends in Action With ASP.NET Core - Composition via Blazor WebAssembly Based Web Components
This is another post in my series on implementing the samples from Micro Frontends in Action in ASP.NET Core:
- Server-Side Routing via YARP in Azure Container Apps
- Composition via YARP Transforms and Server-Side Includes (SSI)
- Composition via Blazor WebAssembly Based Web Components
- Communication Patterns for Blazor WebAssembly Based Web Components
- Universal Rendering With Blazor WebAssembly Based Web Components
This time I'm jumping from server-side composition to client-side composition. I've used the word jumping because I haven't fully covered server-side composition yet. There is one more approach to server-side composition which I intend to cover later, but as lately I was doing some Blazor WebAssembly work I was more eager to write this one.
Expanding The Project
As you may remember from the first post, the project consists of two services that are hosted in Azure Container Apps.

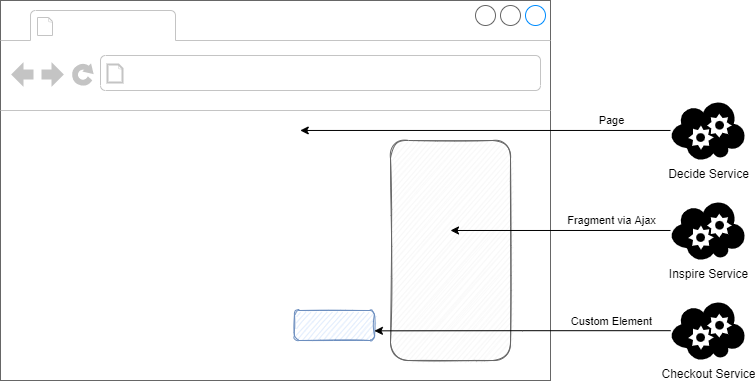
Both services are using server-side rendering for their frontends, and the Decide service is loading Inspire service frontend fragment via Ajax. It's time to bring a new service to the picture, the Checkout service.
The Checkout service is responsible for checkout flow. As this flow is more sophisticated than what Decide and Inspire services provide, the Checkout service requires client-side rendering to provide the experience of a single page application. This requirement creates a need for isolation and encapsulation of the Checkout service frontend fragment. There is a suite of technologies that can help solve that problem - Web Components.
Web Components
Web Components aim at enabling web developers to create reusable elements with well-encapsulated functionality. To achieve that, they bring together four different specifications:
- Custom Elements, which allows defining your own tags (custom elements) with their business logic.
- Shadow DOM, which enables scripting and styling without collisions with other elements.
- HTML Templates, which allows writing markup templates.
- ES Module, which defines a consistent way for JavaScript inclusion and reuse.
The Custom Elements is the most interesting one in this context. The way to create a Custom Element is to implement an ES6 class that extends HTMLElement and register it via window.customElements.define. The class can also implement a set of lifecycle methods (constructor, connectedCallback, disconnectedCallback, or attributeChangedCallback). This allows for initializing a SPA framework (Angular, React, Vue, etc.) and instructing it to use this as a root for rendering.
This is exactly what is needed for the Checkout service, where the SPA framework will be Blazor WebAssembly.
Creating a Blazor WebAssembly Based Custom Element
The way Blazor WebAssembly works fits nicely with Custom Elements. If you've ever taken a look at the Program.cs of a Blazor WebAssembly project, you might have noticed some calls to builder.RootComponents.Add. This is because the WebAssembly to which your project gets compiled is designed to perform rendering into elements. Thanks to that a Blazor WebAssembly application can be wrapped into a Custom Element, it just requires proper initialization. You will be happy to learn, that this work has already been done. As part of AspLabs Steve Sanderson has prepared a package and instructions on how to make Blazor components available as Custom Elements. Let's do it.
I've started with an empty Blazor WebAssembly application hosted in ASP.NET Core, to which I've added a component that will server as a button initiating the checkout flow (the final version of that component will also contain some confirmation toast, if you're interested you can find it here).
<button type="button" @onclick="OnButtonClick">buy for @(String.IsNullOrWhiteSpace(Sku) ? "???" : _prices[Sku])</button>
...

@code {
    // Dictionary of tractor prices
    private IDictionary<string, int> _prices = new Dictionary<string, int>
    {
        { "porsche", 66 },
        { "fendt", 54 },
        { "eicher", 58 }
    };

    ...
}
Next, I've added the Microsoft.AspNetCore.Components.CustomElements package to the project.
<Project Sdk="Microsoft.NET.Sdk.BlazorWebAssembly">
  ...
  <ItemGroup>
    ...
    <PackageReference Include="Microsoft.AspNetCore.Components.CustomElements" Version="0.1.0-alpha.*" />
  </ItemGroup>
</Project>
I've removed all .razor files besides the above component and _Imports.razor. After that, I modified the Program.cs by removing the builder.RootComponents.Add calls and adding builder.RootComponents.RegisterAsCustomElement to expose my component as a checkout-buy element.
...

var builder = WebAssemblyHostBuilder.CreateDefault(args);

builder.RootComponents.RegisterAsCustomElement<BuyButton>("checkout-buy");

await builder.Build().RunAsync();
This is it. After the build/publish the service will server the custom element through the _content/Microsoft.AspNetCore.Components.CustomElements/BlazorCustomElements.js script, so it's time to plug it into the page served by Decide service.
Using a Blazor WebAssembly Based Custom Element
Before the Decide service can utilize the custom element, it is necessary to set up the routing. As described in previous posts, all services are hidden behind a YARP-based proxy, which routes the incoming requests based on prefixes (to avoid conflicts). So far, both services were built in a way where the prefixes were an integral part of their implementation (they were included in actions and static content paths). With the Checkout service that would be hard to achieve, due to Blazor WebAssembly static assets.
There is a way to control the base path for Blazor WebAssembly static assets (through StaticWebAssetBasePath project property) but it doesn't affect the BlazorCustomElements.js path. So, instead of complicating the service implementation to handle the prefix, it seems a lot better to make the prefixes a proxy concern and remove them there. YARP has an out-of-the-box capability to do so through PathRemovePrefix transform. There is a ready-to-use extension method (.WithTransformPathRemovePrefix) which allows adding that transform to a specific route.
...

var routes = new[]
{
    ...
    (new RouteConfig
    {
        RouteId = Constants.CHECKOUT_ROUTE_ID,
        ClusterId = Constants.CHECKOUT_CLUSTER_ID,
        Match = new RouteMatch { Path = Constants.CHECKOUT_ROUTE_PREFIX + "/{**catch-all}" }
    }).WithTransformPathRemovePrefix(Constants.CHECKOUT_ROUTE_PREFIX),
    ...
};

var clusters = new[]
{
    ...
    new ClusterConfig()
    {
        ClusterId = Constants.CHECKOUT_CLUSTER_ID,
        Destinations = new Dictionary<string, DestinationConfig>(StringComparer.OrdinalIgnoreCase)
        {
            { Constants.CHECKOUT_SERVICE_URL, new DestinationConfig() { Address = builder.Configuration[Constants.CHECKOUT_SERVICE_URL] } }
        }
    }
};

builder.Services.AddReverseProxy()
    .LoadFromMemory(routes, clusters);

...
Now the Decide service views can be modified to include the custom element. The first step is to add the static assets.
<html>
  <head>
    ...
    <link href="/checkout/static/components.css" rel="stylesheet" />
  </head>
  <body class="decide_layout">
    ...
    <script src="/checkout/_content/Microsoft.AspNetCore.Components.CustomElements/BlazorCustomElements.js"></script>
    <script src="/checkout/_framework/blazor.webassembly.js"></script>
  </body>
</html>
Sadly, this will not be enough for Blazor to work. When Blazor WebAssembly starts, it requests additional boot resources. They must be loaded from the Checkout service as well, which means including the prefix in URIs. This can be achieved thanks to the JS initializers feature which has been added in .NET 6. The automatic start of Blazor WebAssembly can be disabled, and it can be started manually which allows providing a function to customize the URIs.
<html>
  ...
  <body class="decide_layout">
    ...
    <script src="/checkout/_framework/blazor.webassembly.js" autostart="false"></script>
    <script>
      Blazor.start({
        loadBootResource: function (type, name, defaultUri, integrity) {
          return `/checkout/_framework/${name}`;
        }
      });
    </script>
  </body>
</html>
Finally, the custom element can be used. It will be available through a tag matching the name provided as a parameter to builder.RootComponents.RegisterAsCustomElement.
<html>
  ...
  <body class="decide_layout">
    ...
    <div class="decide_details">
      <checkout-buy sku="porsche"></checkout-buy>
    </div>
    ...
  </body>
</html>
The Expanded Project
As with previous samples, I've created a GitHub Actions workflow that deploys the solution to Azure. After the deployment, if you navigate to the URL of the ca-app-proxy Container App, you will see a page with following layout.
You can click the button rendered by the custom element and see the toast notification.
This approach highlights one of the benefits of micro frontends, the freedom to choose the fronted stack. Thanks to the encapsulation of the Blazor WebAssembly app into a custom element, the Decide service can host it in its static HTML without understanding anything except how to load the scripts. If we would want to hide even that (something I haven't done here) we could create a script that encapsulates Blazor WebAssembly loading and initialization. That script could be a shared asset that loads Blazor WebAssembly from CDN (which besides the performance benefit would be also a way to go for a solution with multiple services using Blazor WebAssembly).