
Commits Promotion Between GitHub and Azure Databricks
One of the projects I'm currently working on is utilizing Azure Databricks for its machine learning component. The machine learning engineers working on the project wanted to use external IDEs for the development. Unfortunately, using external IDEs doesn't remove all needs for developing or testing directly in Azure Databricks. As we wanted our GitHub repository to be the only source of truth, we had to establish a commits promotion approach that would enable that.
Azure Databricks has support for Git integration, so we've decided to start by using it to integrate Azure Databricks with GitHub.
Configuring GitHub Credentials in Azure Databricks
The first step in setting up Git integration with Azure Databricks is credentials configuration. This is something that every engineer needs to do independently, to enable syncing workspace with a specific branch. It requires the following actions:
- Login to GitHub, click the profile picture and go to
Settingsand thenDeveloper settingsat the bottom. - On the
Settings / Developer settingsswitch toPersonal access tokensand clickGenerate new token. Fill in the form:
- Provide a recognizable
Notefor the token. - Set the
Expirationcorresponding to the expected time of work on the project. Select the
reposcope.
- Provide a recognizable
- Click
Generate tokenand copy the generated string. - Launch the Azure Databricks workspace.
- Click the workspace name in the top right corner and then click the
User Settings. On the
Git Integrationtab selectGitHub, provide your username, paste the copied token, and clickSave.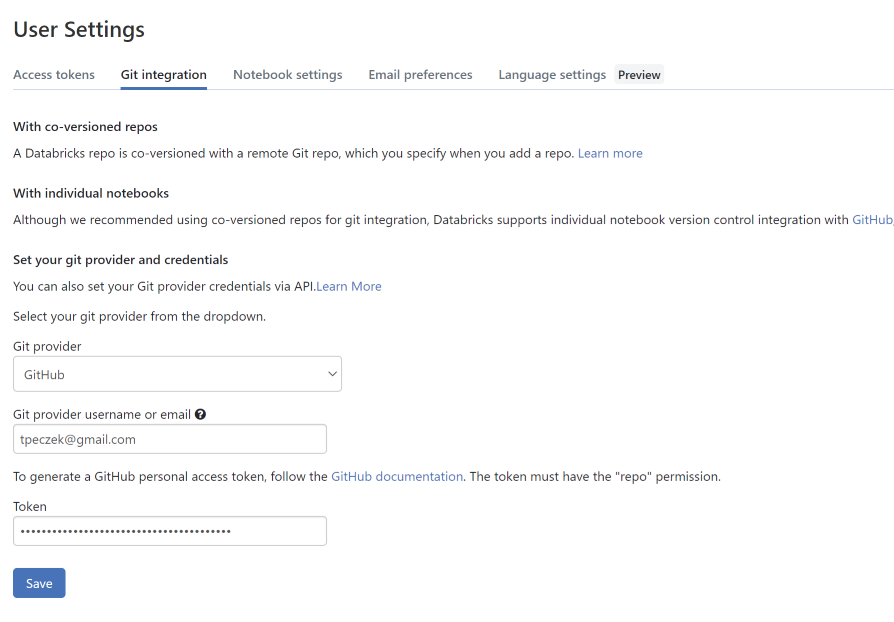
Once the credentials to GitHub have been configured, the next step is the creation of an Azure Databricks Repo.
Creating Azure Databricks Repo Based on GitHub Repository
An Azure Databricks Repo is a clone of your remote Git repository (in this case GitHub repository) which can be managed through Azure Databricks UI. The creation process also happens through UI:
- Launch the Azure Databricks workspace.
- From the left menu choose
Reposand then clickAdd Repo. Fill in the form:
- Check the
Create repo by cloning a Git repository. - Select
GitHubasGit provider. - Provide the
Git repository URL. The
Repository namewill auto-populate, but you can modify it to your liking.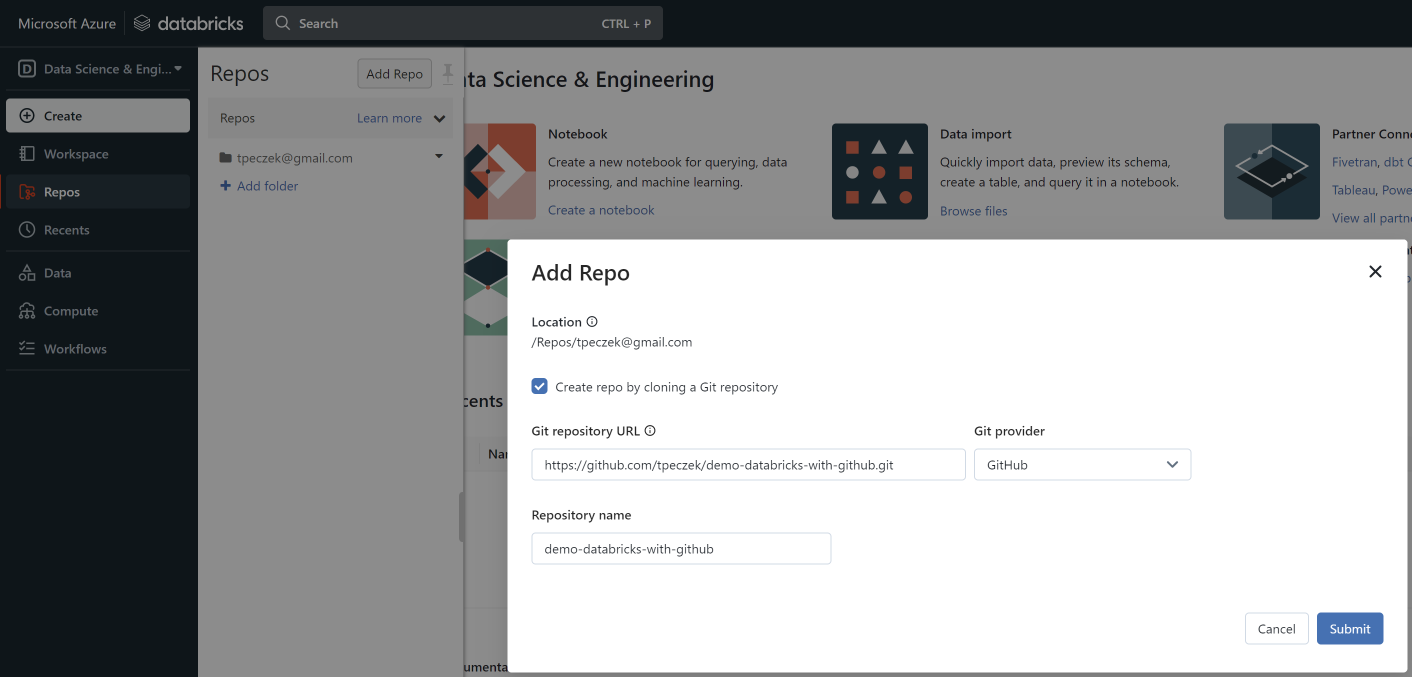
- Check the
- Click
Submit.
And it's done. You can now select a branch next to the newly created Azure Databricks Repo. If you wish you can click the down arrow next to the repo/branch name and create a notebook, folder, or file. If the notebook you want to develop in has been already in the cloned repository, you can just select it and start developing.
Promoting Commits From Azure Databricks Repo to GitHub Repository
As I've already mentioned, Azure Databricks Repo is managed through the UI. The Git dialog is accessible through the down arrow next to the repo/branch name or directly from the notebook through a button placed next to the name of the notebook (the label of the button is the current Git branch name). From the Git dialog, you can commit and push changes to the GitHub repository.

If you are interested in other manual operations, like pulling changes or resolving merge conflicts, they are well described in the documentation. I'm not going to describe their details here, because those are the operations we wanted to avoid by performing the majority of development in external IDEs and automating commits promotion from GitHub to Azure Databricks Repo.
Promoting Commits From GitHub Repository to Azure Databricks Repo
There are two ways to to manage Azure Databricks Repos programmatically: Repos API and Repos CLI. As GitHub-hosted runners doesn't come with preinstalled Databricks CLI, we've decided to go with Repos API and PowerShell.
We wanted a GitHub Actions workflow which would run on every push and update all Azure Databricks Repos mapped to the branch to which the push has happened. After going through API endpoints we came up with following flow.

Before we could start the implementation there was one more missing aspect - authentication.
Azure Databricks can use an Azure AD service principal as an identity for an automated tool or a CI/CD process. Creation of a service principal and adding it to an Azure Databricks workspace is a multistep process, which is quite well described in the documentation. After going through it, you should be able to create the following actions secrets for your repository:
AZURE_SP_CLIENT_ID- Application (client) ID for the service principal.AZURE_SP_TENANT_ID- Directory (tenant) ID for the service principal.AZURE_SP_CLIENT_SECRET- Client secret for the service principal.AZURE_DATABRICKS_WORKSPACE_INSTANCE_NAME- The Azure Databricks workspace instance name.
With help of the first three of those secrets and the Microsoft identity platform REST API, we can obtain an Azure AD access token for the service principal. The request we need to make looks like this.
https://login.microsoftonline.com/<AZURE_SP_TENANT_ID>/oauth2/v2.0/token
Content-Type: application/x-www-form-urlencoded

client_id=<AZURE_SP_CLIENT_ID>&grant_type=client_credentials&scope=2ff814a6-3304-4ab8-85cb-cd0e6f879c1d%2F.default&client_secret=<AZURE_SP_CLIENT_SECRET>
The magical scope value (the URL-encoded 2ff814a6-3304-4ab8-85cb-cd0e6f879c1d/.default) is a programmatic identifier for Azure Databricks. The response to this request is a JSON object which contains the Azure AD access token in the access_token field. The PowerShell script to make the request and retrieve the token can look like the one below (assuming that the secrets have been put into environment variables).
$azureAdAccessTokenUri = "https://login.microsoftonline.com/$env:AZURE_SP_TENANT_ID/oauth2/v2.0/token"
$azureAdAccessTokenHeaders = @{ "Content-Type" = "application/x-www-form-urlencoded" }
$azureAdAccessTokenBody = "client_id=$env:AZURE_SP_CLIENT_ID&grant_type=client_credentials&scope=2ff814a6-3304-4ab8-85cb-cd0e6f879c1d%2F.default&client_secret=$env:AZURE_SP_CLIENT_SECRET"

$azureAdAccessTokenResponse = Invoke-RestMethod -Method POST -Uri $azureAdAccessTokenUri -Headers $azureAdAccessTokenHeaders -Body $azureAdAccessTokenBody
$azureAdAccessToken = $azureAdAccessTokenResponse.access_token
Having the token, we can start making requests against Repos API. The first request we want to make in our flow is for getting the repos.
$azureDatabricksReposUri = "https://$env:AZURE_DATABRICKS_WORKSPACE_INSTANCE_NAME/api/2.0/repos"
$azureDatabricksReposHeaders = @{ Authorization = "Bearer $azureAdAccessToken" }

$azureDatabricksReposResponse = Invoke-RestMethod -Method GET -Uri $azureDatabricksReposUri -Headers $azureDatabricksReposHeaders
The $azureDatabricksReposHeaders will be used for subsequent requests as well, because we assume that the access token shouldn't expire before all repos are updated (the default expiration time is ~60 minutes). There is one more assumption here - that there are no more than twenty repos. The results from the /repos endpoint are paginated (with twenty being the page size) which the above script ignores. If there are more than twenty repos, the script needs to be adjusted to handle that.
Once we have all the repos we can iterate through them and update those which have matching URL (in case different repositories than the current one has also been mapped) and branch (so we don't perform unnecessary updates).
$githubRepositoryUrl = $env:GITHUB_REPOSITORY_URL.replace("git://","https://")

foreach ($azureDatabricksRepo in $azureDatabricksReposResponse.repos)
{
    if (($azureDatabricksRepo.url -eq $githubRepositoryUrl) -and ($azureDatabricksRepo.branch -eq $env:GITHUB_BRANCH_NAME))
    {
    $azureDatabricksRepoId = $azureDatabricksRepo.id;
    $azureDatabricksRepoUri  = "https://$env:AZURE_DATABRICKS_WORKSPACE_INSTANCE_NAME/api/2.0/repos/$azureDatabricksRepoId"
    $updateAzureDatabricksRepoBody = @{ "branch" = $azureDatabricksRepo.branch }

    Invoke-RestMethod -Method PATCH -Uri $azureDatabricksRepoUri -Headers $azureDatabricksReposHeaders -Body ($updateAzureDatabricksRepoBody|ConvertTo-Json)
    }
}
The GITHUB_REPOSITORY_URL and GITHUB_BRANCH_NAME are being injected into environment variables from github context of the action.
That's all the logic we need, you can find the complete workflow here. Sadly, at least in our case, it has thrown the following error on the first run.
{"error_code":"PERMISSION_DENIED","message":"Missing Git | provider credentials. Go to User Settings > Git Integration to | add your personal access token."}
The error does make sense. After all, from the perspective of Azure Databricks, the service principal is a user and we have never configured GitHub credentials for that user. This raised two questions.
The first question was, which GitHub user should those credentials represent? This is where the concept of a GitHub machine user comes into play. A GitHub machine user is a GitHub personal account, separate from the GitHub personal accounts of engineers/developers in your organization. It should be created against a dedicated email provided by your IT department and used only for automation scenarios.
The second question was, how to configure the credentials. You can't launch the Azure Databricks workspace as the service principal user and do it through the UI. Luckily, Azure Databricks provides Git Credentials API which can be used for this task. You can use Postman (or any other tool of your preference) to first make the described above request for Azure AD access token, and then make the below request to configure the credentials.
https://<WORKSPACE_INSTANCE_NAME>/api/2.0/git-credentials
Content-Type: application/json

{
   "personal_access_token": "<GitHub Machine User Personal Access Token>",
   "git_username": "<GitHub Machine User Username>",
   "git_provider": "GitHub"
}
After this operation, the GitHub Actions workflow started working as expected.
What This Is Not
This is not CI/CD for Azure Databricks. This is just a process supporting daily development in the Azure Databricks context. If you are looking for CI/CD approaches to Azure Databricks, you can take a look here.